Bernards' Injection Molding Tips, Techniques and Technology for Shop Floor Technicians and Supervisors | home
SHOP FLOOR TIPS | MORE TIPS | MORE TIPS STILL | SAFETY | TROUBLESHOOTING | RHEOLOGY | DE-COUPLED MOLDING | MOLD FLOW ANALYSIS | MOLD CHANGE FORM | SHOP FLOOR RULES | WATT-WATTCHER | MORE PATENTS | QUESTIONS/COMMENTS
SHOP FLOOR TIPS
ARE YOU READY TO TAKE A COLD, HARD, CRITICAL LOOK AT YOUR PLANT? EACH OF THE FOLLOWING TIPS IS ELEMENTARY BUT MAY BE THE SOLUTION TO PROBLEMS THAT HAVE BEEN PLAGUING YOUR PLANT FOR YEARS! IT IS QUITE EASY TO OVERLOOK THE MOST BASIC "ROOT CAUSES" WHILE SEARCHING FOR THE ESOTERIC
(You can turn off the music if you like)
1) Are your desiccant driers properly connected?
It is not enough to simply verify that there is a delivery and return hose. Check for leaks, clamps and kinks. Leaks decrease the dryers' ability to remove moisture from the material. Check the hoses thoroughly, even run your hand across the entire length. Missing clamps cause the loss of air flow and pressure. There should be a clamp at each end of the hose and the clamps should be tight and secure. Also check for kinks. Hose kinks also cause a loss in air flow and pressure. Check your dryer cones too. Is there one in each hopper? Are they of adequate size for the press? Is there material inside the cones? Are they damaged. A damaged cone can fill with raw material and seriously affect the dryness of your material. Is the return hose opening on the top of your dryer located in such a manner that it cannot draw material into the return air flow? If not, drawn up material can block the drier intake filter and seriously affect air flow. Moreover, it can also damage the drier!
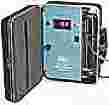
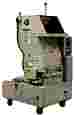
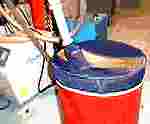
PORTABLE DEW POINT METERS
2) Are your dryers properly maintained?
Do you periodically check your dryers' dew point. Do you understand what a dew point is and how it affects your driers ability to remove moisture. How often do you check and replace your desiccant? How often do you check and clean the intake filters.
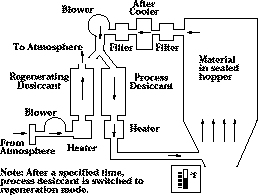
Typical Dryer
Dew point is a measurement that indicates the dryness of the air flow to your hopper. Simply put, it means that if you took a sample of that air and cooled it down, its dew point temperature indicates the temperature at which the moisture contained in that air would condense out. For example, a -40 Degree F. dew point tells you that you would have to cool the air sample to 40 Degrees below 0. Low dew points mean drier air. Your dryers should be able to maintain at least a -20 Degree dew point after the process has stabilized.
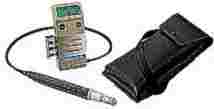
How do you check your dew points? Many dryers have a built in dew point meter but do you always trust them? Often the sending units will go bad and indicate a low dew point regardless of what it actually is. It is a good idea and worthwhile investment to purchase a portable dew point meter and make periodic checks as part of your Preventative Maintenance Procedures.
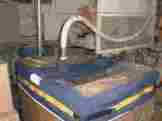
TYPICAL ROTATING
CANISTER DRYER
Desiccant is a substance that removes moisture from the air flow to your hopper. More accurately, it is called a "molecular sieve". If you took a very powerful electron microscope and examined it, under very high magnification you would see a porous surface that looked like tunnels or caves. The openings would be large but as they tunneled into the interior, the diameters would become smaller and smaller. These openings are large enough to oxygen, nitrogen, carbon dioxide, etc. and water vapor to enter. The molecules of gases in the air are small enough that they can pass right thru the "tunnels" and out the other side. However, water molecules ate much larger. They can enter the tunnels bit get trapped where the tunnels get narrower. This is how the desiccant removes the moisture. But once trapped, how to you get it back out? This is done by heating the desiccant, typically to 500 degrees F. The water vapor molecules get very active under high temperature and start 'bouncing around". Indeed, they bounce right out of the tunnels! The desiccant is then cooled down. This is why desiccant dryers have two desiccant beds. One is being dried out or "regenerated" while the other is in use.

DEGRADED DESICCANT LIFE SIZE
Desiccant can and does go bad and this can happen in a number of ways. When raw plastic material is drying it gives off various chemicals, such as plasticizers, additives, compounds from chemical reactions, etc. These are large molecules and when they enter the tunnels they, like water vapor, can get trapped there. Some molecules are so large that they can't even enter the tunnels but stick and block the openings. Regeneration, the heating of the desiccant does drive them out but not 100%. Over time, the they accumulate and the desiccants ability to remove moisture depreciates. Desiccants eventually go bad due to "thermal shock". Every two hours the molecular sieves are heated to at least 500 degrees F. and then cooled back down. This constant thermal cycling causes the desiccant to eventually disintegrate. Desiccant can also become contaminated with raw material. If the intake filter is damaged with holes or leaks, raw material can enter and be drawn into the desiccant bed. There it melts, degrades and blocks the air flow. Sometimes part of the desiccant can be salvaged by removing the melted material and the top layer of desiccant. Sometimes it is completely ruined and must be replaced. Desiccant is very expensive. Down time for driers is costly too as well as the labor for repairs.
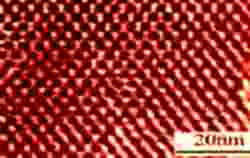
ELECTRON MICROSCOPE PHOTO OF "TUNNELS"
IN MOLECULAR SIEVE DESICCANT
Minimally, the dryer intake filters should be checked and cleaned at least every time a mold is changed. Ideally, they should be checked and cleaned at least every 24 hours. Filters get clogged with material fines and especially from regrind. Cleaning is a simple process of blowing them out with an air hose (wear safety glasses!). Checking means looking for rips, leaks, etc. and making certain the filter is securely attached with clamps. The filter access door should also be checked to be certain that the gasket is intact and the door does not leak.
3) Is there a magnet in every hopper and is it properly sized? How often is the magnet cleaned. Do you know how many magnets you have. Do your material handlers use their shirt pockets? Do your machine operators wear rings when they grind scrap?

Obviously, the purpose of hopper magnets is to trap ferrous metals (trimming knife blades, pieces of granulator knives that break off into regrind, paper clips, tramp metal, etc.). If magnets are missing, metal will enter the barrel. There it can and eventually will damage the screw and barrel. It can also block your nozzle tip. It can block gates in molds and it can get trapped in hot manifolds! Metal entering a barrel can cause very serious and expensive damage. Generally speaking, a larger magnet is better than a smaller magnet because it has a larger surface area. Also, the more expensive ceramic magnets are superior to the cheaper iron magnets because ceramic has much more powerful gauss fields. Magnets should be cleaned when ever a mold is changed and minimally, perhaps once a week. They should never be cleaned near the hopper for fear some metal might fall in!
Do your material handlers use their shirt pockets? If so, you have molded ink pens, pencils, pocket change, candy wrappers and what ever else they carry in their shirt pockets. The reason is that when they bend down over gaylords, drums, hoppers, etc., things fall out of their pockets and sometimes they do not see this! Hence, they are eventually "processed" and molded. Do your machine operators wear rings when they use granulators. If so, you have probably already had a ring (perhaps diamond too!) ground and processed.
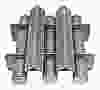
ECONOMY MAGNET SUPER MAGNET
4) Is every material container in your plant securely covered at all times (when not in active use) and is every material container properly identified?
Every single material container in your plant should be covered. Obviously, this is to prevent contamination. For example, do you have gaylords or drums sitting near your presses. If uncovered, what might happen if a hydraulic oil line or a water line were to break? It could contaminate the entire container. What would happen if a disgruntled employee came along with a handful of pennies or a different kind of material. There are all kinds of things in the shop floor environment that can contaminate material.
Is every material container identified? At a minimum, the label should specify the manufacturer, type, (e.g. PP, ABS, Nylon, etc.) lot number virgin/regrind and date). This goes a long way in preventing contamination. Are not granulators and hoppers also material containers? Likewise, they too should be identified.
Drum and Gaylord covers
5) Are all your barrel heater bands in working order? How do you check them out?
Just because the barrel controllers indicate that the barrel is up to heat and is heating evenly, this is not proof that it is so! When barrel bands burn out the adjacent bands will cycle on and off at a greater on rate to make up for the loss of BTU's. Eventually enough bands burn out that the adjacent bands cannot compensate and the barrel will not come up to heat although the controller indicates that power is being applied all the time. Burned out heater bands can wreck havoc with a process and at the very least cause shot to shot inconsistencies. Before one can monitor heater band failure it is necessary to determine that they are all working in the first place. There are several ways to do this and I will first describe the simplest way. Wait until the press has been down for a lengthy period of time so the barrel is at room temperature. Remove the barrel cover. Turn on the barrel heats for, say, 30 seconds. After thirty seconds turn off the heats and then lock out the main power with a key lock. After the main power is locked out carefully measure the temperature of each heater band with a pyrometer and a surface probe. Bands that were working will be warm. Burned out heater bands will be cold.
The second method is more complicated and time consuming. First remove the barrel cover, turn off the heats and then lock out the power with your key lock. You will then take resistance readings of each band. For sake of discussion, lets say that you are measuring a 960 watt, 240 volt band. Power (watts) equals Current times Resistance. Thus, a 960 watt, 240 volt band should draw 4 amps. Ohms law states that Voltage equals Current times Resistance. Likewise, Resistance equals Voltage divided by Current. Thus, the Resistance should equal 240 (volts) divided by 4 (amps) or in other words 60 ohms. Right? Wrong! The 60 ohm resistance is the effective resistance of a heater when it is hot and under load. However, you will be checking the resistance of a cold heater band. Resistance of a heater band is much lower when it is cold then when it is hot. Thus, expect the cold resistance of that band to be at least half, at least 30 ohms. Then too, some bands will be wired in parallel. In that case it is wise to disconnect on lead (wire) of the circuit so you can check the resistance independently. It does not matter, however, if the bands are wired in series. You can check them without disconnecting any leads.
The third method should only be attempted if you are qualified because it involves taking current measurements while the power is on. Because this can be dangerous if you do not know exactly what you are doing, and because I do not know who might be reading this, I will not describe the methodology. A little knowledge can be a dangerous thing.
6) Is periodic monitoring of your heater bands part of your Preventative Maintenance? Would you like to know a very quick way to check them while the press is running production without shutting it down?
As explained earlier, burned out barrel heater bands can wreck havoc with the molding process. For that reason monitoring should be part of the process. However, at times it can be very difficult to get down time for maintenance due to the need to run production. The following is a method that allows you to check the heater bands condition while the press is in production! First, however, you must use one of the above methods to be certain that all the bands are functioning in the first place. Once you have determined that you are ready to take your readings. Typically, molding machines have three or four barrel zones. As you look into the control cabinet you will see a like number of zone relays. Each relay will have three output terminals connected to wires that lead to the bands. Obviously, this is where the bands get their power. After you are certain that every band works, you will take sequential current readings of each of the three legs running from the bottom (or even top) of each zone. Use an Amp Probe to do this. You will then record the data on a chart similar to that described below:
PRESS # xxx
Zone
|
Leg #1
|
Leg #2
|
Leg #3
|
Front
|
20 amps
|
19.9 amps
|
20.1 amps
|
Center
|
18.9 amps
|
19 amps
|
18.8 amps
|
Rear
|
24 amps
|
23.9 amps
|
24.1 amps
|
You now have a chart that tells you approximately how many amps each leg draws when all heater bands are functional. You button up the press and put it back into production. Later, when you come back, you can check the heater bands while the press is running and in production! Simply open the control panel, clip your Amp Probe around the wire from each leg and take a reading. If, for example, you see that Center Zone, Leg #2 is only drawing 15.2 amps, you know that a band is burned out. Note too that you should always endeavor to replace bands with new bands of the same wattage. If you use higher of lower wattage you risk hot spots or cold spots on the barrel. 
7) Are any of your screw check rings or ball checks leaking? Do you know how to tell?
A check ring or ball check is located at the end of the screw tip and it has two purposes. When the screw is recovering, it permits material to pass by it and into the area in front of the screw. When the screw (ram) is injecting, it seals the material from leaking past so the screw can inject material into the mold. Check rings and ball checks can become damaged or simply wear out. Damage usually occurs when metal gets into the material. This can cause nicks and abrasions and even crack a check ring. Cold start ups or excessively low front zone temperature can crack a check ring or even break a screw tip. Check rings and ball checks can also wear out not only from abrasive materials but also simply from the frictional wear of sealing cycle after cycle over time. How does one determine if a check ring or ball check is bad? There are two very obvious indications. If a screw cannot hold a cushion and drifts right thru it, most probably the ring, ball or seat is bad. Another indication is when the screw rotates backwards during injection. This is caused by material leaking past the seal and flowing up the screw flights. Indeed, in worse cases it can flow all the way back and into the throat!
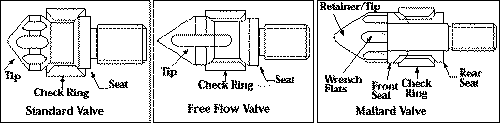
A good check ring or ball check is absolutely mandatory for consistent processing. Yes, there are a few tricks of the trade to try and compensate for leakage but one is then trying to mold around a machine problem rather than molding to suit the mold and process. In a later section you will read about screw and barrel Preventative maintenance.
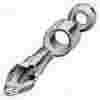
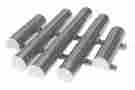
CHECK RING BALL CHECK
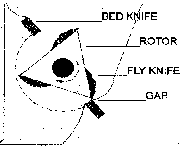
8) Are all your granulator blades set properly and are they kept sharp? How many are damaged?
It is often said that regrind is difficult to mold. One possible reason might be that you have worn and chipped granulator blades and they may also not be properly set. Bad blades can cause regrind fines and often, as in the case of molding HDPE, these fines can cause splay like defects. Fines can be particularly bad too when grinding reinforced materials and fines can reduce the physical properties of the parts you mold. How often do you check your blades? They should be checked at least once a month. When inspecting blades the gap should also be measured. Set the gap to the dimension recommended by the granulator manufacturer. If you do not know that spec. then set the gap to between .003" and .005". The gap should be constant across the entire length of the blade. Blades should be kept sharp. This can be done in your own plant is you have a surface grinder. If not that, than they can also be sent out. Particularly damaged blades that have large chips can be welded and resharpened.